Showing posts with label Side-dishes. Show all posts

Monday, June 17, 2013

Mango-avocado salad with coriander-lime dressing

I once ate this in a restaurant in Stockholm and immediately set upon re-creating the dish when I got home. It's AMAZING! The combination of flavors is perfect and it's great both as a starter and a main course. In this case I served it with some seared tuna, but garlic infused jumbo shrimp off the barbecue work a treat too.

One cautionary note though: you need to make sure (!!) that you get RIPE avocados and a RIPE mango. This dish won't work at all if you end up with a half-ripe avocado or one of those horrible mangos that tastes like nothing. Unless you have a reliable source, I therefore recommend buying both a few days in advance.


Ingredients (serves 2 as a main or 4 as a starter):

2 ripe avocados
1 large mango
1 bunch of coriander
2 limes
2 large tomatoes
Vegetable oil (olive oil doesn't work here)
1-2 red chilis
salt


Preparation

1. Peel the avocados and the mango and cut both in 1cm cubes. Finely chop the coriander leaves, putting the stems aside. Halve the tomatoes and remove the seeds, then cut the tomato into smallish cubes. In a salad bowl, mix the mango, the avocado and the tomato. 

2. For the dressing, mix 3-4 tablespoons of vegetable oil, the juice of 1-1 1/2 limes (see note below), the chili and roughly 2 tablespoons of the coriander stems in a blender. Add some salt and pepper and season to taste. Depending on the limes, you might need to add a little bit of sugar, but be careful, you want this to be quite acidic. It should also be quite spicy :-)

3. Just before serving (and really JUST before), add the dressing to the salad and mix thoroughly. Season to taste and add the coriander. 

A quick note on the dressing: it is a bit difficult to give exact amounts here. Much will depend on the sweetness of the mango and the sourness of the limes. Essentially, what you are aiming for is a balance between the sweetness of the fruit and the acidity of the dressing. The salad should have a nice zing to it.

Saturday, June 15, 2013

Green beans with lemon vinaigrette and parmesan

For some reason I tend to make beans mainly in winter. In the summer I veer towards grilled veggies or salads (and I am no fan of adding green beans to salads)....until, a few years ago, my mother told me about this recipe. I think it's the perfect way to make green beans in the summer. It's worth making this just for the color combination alone :-)


Ingredients (serves 2):

1 packet of green beans
1 lemon
1 handfull of grated parmesan 
olive oil 
salt, pepper

Preparation

1. Clean the beans and cook them for 5-7 minutes in boiling (salted) water. The beans should be "al dente", not soft or limp! Once cooked, drain the beans and chuck them in a bowl filled with ice cold water (best to add a few ice cubes). This not only prevents the beans from cooking further, it also turns the beans a lovely bright shade of green. 

2. For the vinaigrette just mix 4 tablespoons of olive oil with 2-3 tablespoons of lemon juice, some salt and some pepper. You want this to be on the sour side (the parmesan will partially compensate the acidity later on). 

3. Just before serving, mix the beans with the vinaigrette and sprinkle with the parmesan. 

Sunday, June 9, 2013

Spicy oven-baked sweet potatoes

Sweet potatoes are a favorite in my household and I make them at every opportunity. In the winter I usually prefer the mashed version, but during barbecue season these here are great as a side-dish. They are extremely easy to make and are perfect to accompany all kinds of meat dishes. Although, truth be told, I am perfectly happy having just these, some grilled vegetables and a nice fresh yoghurt dip.


Ingredients (for 2):

1-2 sweet potatoes (I used 2 medium-sized ones)
1 red chili
coarse sea salt, black pepper
olive oil
chili powder (optional)
maple syrup (optional)

Preparation

1. Peel the sweet potatoes and cut them into longish stripes. Finely slice the red chili. Mix both with 2 tablespoons of olive oil, a generous amount of sea salt, and some back pepper. In case you prefer your potatoes on the spicy side, add half a teaspoon of chili powder. 

2. Cover a baking tray with some baking paper and evenly spread the potatoes on top. Place in the preheated oven (180°C, fan-assisted) for about 20mins. 

3. Now you have two options: you can either just leave the potatoes in for another 10 minutes at the same heat. Alternatively, you can drizzle the potatoes with some maple syrup (1 tablespoon is plenty, otherwise it will be way too sweet) and place the tray under the grill for about 5 mins. Watch this carefully, it will burn quickly. 

Just to make sure that there are no misunderstandings...these aren't going to be crispy! They contain less starch than normal white potatoes, so unless you fry them (recipe to follow), they are going to remain soft where they are thickest, turning crisp only on the thinner ends.

Friday, May 3, 2013

BBQ Chicken with grilled vegetables

Spring may be slow in coming, but the BBQ seasoned has been officially opened chez Marten. And as usual at the beginning of the season, most things I fancy eating end up being chargrilled. This chicken is a firm favorite with my family and has the added charm of being easy to make AND being easy to shop for. The chicken is wonderfully tender and the marinade can be adjusted to suit your individual taste.    


Ingredients (serves 4)

800 gr chicken breast (without skin) 
Note that this dish can also be made using chicken wings, the only thing that changes is the cooking time - chicken wings will take about 20mins on the bbq.


For the marinade: 
1 1/2 tablespoons of tomato concentrate
4 tablespoons olive oil
1 tablespoons honey
1 teaspoon rosemary
1 tablespoon sweet paprika powder
1/2 tablespoon hot paprika powder
1 tablespoons ketchup
1 teaspoon coarse sea salt
2 cloves of garlic
black pepper
(1 tablespoon of grated ginger or some chopped red chili are optional)

2 red peppers
2 zucchini
1 pack of long-stem broccoli
1 teaspoon rosemary
salt, pepper, olive oil


Preparation: 

1. Place all ingredients for the marinade in a blender and mix until you obtain a smooth paste. Cut the chicken into 2cm stripes (lengthwise). In a freezer bag mix the marinade and the chicken and place in the fridge for about 2-3 hours. Remove from the fridge a good half hour before you start cooking.


2. Wash the vegetables and cut the peppers and zucchini into wide stripes (see picture below). Mix vegetables with some olive oil, salt, pepper and rosemary.

3. Heat the barbecue. Once heated, place the vegetables on the grill (it's best to use a grilling tray). Allow the vegetables to roast for about 10-12 mins before adding the chicken. Since the pieces are quite small, the meat should need no more than 4 minutes on each side.


I serve this with some yoghurt dip (herbs and garlic) and some bread or oven-baked potatoes.


Saturday, April 20, 2013

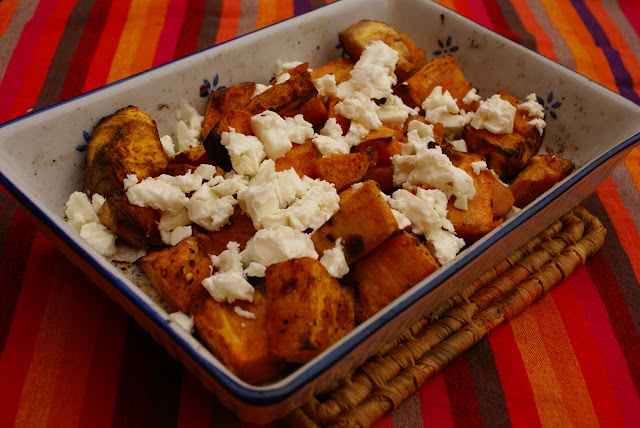
Roast sweet potatoes with feta cheese

I love sweet potatoes...in any form. They have a lovely texture and their sweetness goes incredibly well with meat dishes. In the winter I tend to serve them mashed, but in the summer I prefer this variety. The salty flavor of the feta cheese is in perfect balance with the rich sweetness of the potatoes. Add a bit of chili and you have a perfect side-dish for your barbecued meat.


Ingredients (serves 2): 

1 sweet potato (two if they are small)
100gr of Feta cheese
1/2 tablespoon of hot chili powder (optional)

Preparation

1. Peel the sweet potato and cut into 2cm cubes. Coat with a bit of olive oil and season with salt, pepper, and the chili powder. Put the potatoes in a small baking tray and place it in the oven at 200°C (fan assisted). Roast for about 30 minutes until the potatoes start to turn brown around the edges. 

2. Remove from the oven and crumble the feta cheese over the potatoes. 


Recipe adapted from Jamie Oliver "30-Minute Meals"

Tuesday, March 5, 2013

Indian Naan Bread

For those living in the UK it shouldn't be all that difficult to obtain decent naan bread. In Germany, however, it's close to impossible. More often than not the bread is dry and hard. Instead, I suggest you try making your own. As it turns out, this is not as difficult as you might think. The only challenge is the dough, which is extremely sticky and takes some getting used to. But once you've made your first batch, you'll never go back to the store-bought variety!


Ingredients (makes 4-6 naans):

220
gr flour
12gr fresh yeast (alternatively 1 teaspoon of dried yeast)
3 tablespoons of yoghurt
1 tablespoon of melted butter
1 teaspoon of sugar
2 tablespoons of olive oil
1/2 teaspoon of baking powder
80ml warm water

Preparation:

1.  Dissolve the yeast in the water, adding a tablespoon of sugar (best done in a tall glass). Wait for about 10 minutes until the mixture starts frothing, then add the yoghurt and the olive oil, mixing well.

2. In a large bowl, mix the flour, baking powder and some salt. Add the liquid ingredients and stir using a fork. Once the ingredients start coming together, use your hands to form a soft dough. This is the only really tricky part of this recipe: the dough is going to be extremely moist and sticky and it will seem as though you don't have enough flour, but trust me, it will work. Just keep a small bowl of flour on the side to dip your fingers into now and then. 

3. Once the ingredients are combined into a dough, immediately stop kneading. Cover the bowl with a warm, damp kitchen towel and place in a draft-free place to rest for a good 1 1/2 hours. By then the dough should have doubled in size, at least!

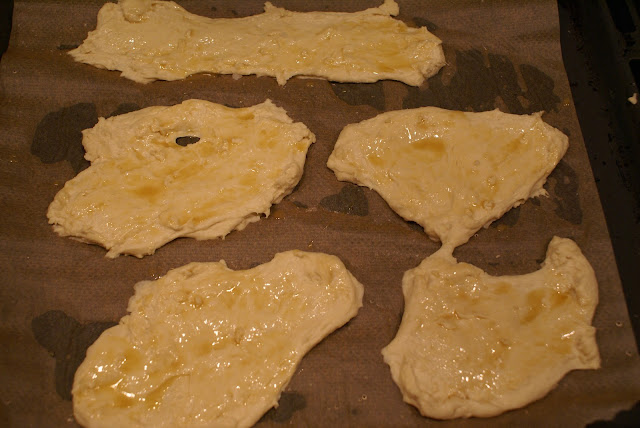
3. Once the dough has risen, simply "deflate" it and separate into 5 pieces (depending on how large you want your naan to be). On a baking tray (covered with baking paper) form longish shapes as seen in the picture below. Sprinkle with some coarse sea salt and brush with the melted butter before placing in the oven (250°C). The naan will be done in about 5 mins.


Rezept adaptiert von: Aarti Sequeira

Monday, February 4, 2013

Braised Chicory

Raw chicory is usually served in salads, often in combination with fruit (pears are a favorite). Supposedly the sweetness of the fruit serves to counterbalance the bitter taste of the chicory. Personally, I find raw chicory is just bitter, no matter how much fruit is added to it. Cooked, however, chicory has a fantastic flavor, especially when combined (as shown here) with some cream, bacon and a generous splash of Vermouth. 

(Allow me a brief comment on the use of butter and cream when cooking. Of course we all know that butter and cream taste great and no-one is ever going to convince me that a potato mash made with that horrible low-fat milk tastes anywhere near as good as proper mash made with proper milk (or cream) and butter. So I strongly advocate to use cream and butter when appropriate. If you want to diet, eat smaller portions or cook something that doesn't require the use of either from the start (the Asian cuisine is perfect for this).) 


Ingredients (serves 4)

2 packs of chicory (usually each pack contains 3)

200 ml single cream
200 gr bacon, cut in to smallish cubes
100 ml Noilly Prat
1 tablespoon of butter
2 teaspoons sugar


Preparation:

1. First you cut each chicory in half (lengthwise) and remove the bitter inner core (careful, if you cut too much you end up with a bunch of loose leaves).

2. Fry the bacon in a pan until crisp. Remove and set aside. Add the butter to the pan and gently fry the chicory, adding the sugar and some salt and pepper (the sugar will caramelize and take the edge off the bitterness of the chicory). Once the chicory starts to take color, remove and set aside. 


3. Put the bacon back into the pan and reheat. Once the bacon starts to sizzle again, add the Noilly Prat and wait until it's reduced to about half. Once that's done, all that's left to do is to add the cream and the chicory.


4. Allow to cook (lid closed) over medium heat for about 30-40 mins until the chicory has softened.

Tuesday, January 8, 2013

Braised Savoy Cabbage

I realize that savoy cabbage is not everybody's idea of a delicious meal, but cooked properly it makes for a great side dish to accompany meat (in this case I served it with Saltimbocca and sweet potato mash). The most common way to make savoy cabbage is of course to chop it up and cook it in a mixture of cream and vegetable stock. Tastes great, but let's face it, it's not a pretty sight...not even to mention all that cream :-). So instead, I have recently started cooking the cabbage in large slices, and rather than using cream I simply use broth.


Ingredients (serves 4)

1 small savoy cabbage, outer leaves removed
300ml beef, vegetable, or chicken stock
Butter

Preparation

1. Cut the cabbage in half and then divide each half into 4 slices (as you would do with a melon). Remove the hard bits at the core and tie each slice with a bit of string (you need to do this to prevent the slices from falling apart). 


2. Bring water to the boil in a large saucepan, add salt, and briefly (1-2 minutes at most) place the cabbage in the water. Remove and immediately place in some ice-cold water. Blanching the cabbage this way helps to retain its color. It also serves to soften the cabbage slightly. Once it has cooled off, remove the cabbage from the water and allow to dry off on a bit of kitchen paper. 

3. Heat some butter in a large pan (I usually use clarified butter) and fry the cabbage at relatively high temperature until it starts to brown slightly. Season with salt and pepper and add the stock. Now place the pan in the oven at 180°C for about 30 minutes until soft.

Friday, January 4, 2013

Saltimbocca with sweet potato mash

In Italy saltimbocca is often served with polenta, but since I am not a huge fan of the later, I prefer to serve it with sweet potato mash...which I love! The saltiness of the Parma ham harmonizes perfectly with the rich sweetness of the mash. I serve this with braised cabbage or spinach (recipes to follow).

The biggest challenge when cooking this recipe is to keep the meat nice and tender. For one this obviously requires high quality meat, so this is not a good place to try to safe money. Equally important, however, is not to overcook the scallopini. Give them just a minimum of time in the frying pan and trust me, they will be done. 


Ingredients (serves 2)


3 veal scallopini (300gr)
3-4 slices of Parma ham
Handfull of sage leaves (fresh!)
1 tablespoon of flour
Butter or olive oil
200ml white wine 

For the mash:
200gr potatoes
400gr sweet potatoes
1 teaspoon of cayenne
2 tablespoons of butter

125ml milk or cream


Preparation: 


1. First, place the scallopini between two sheets of cling film and pound into thin slices. Cut into 2 or 3 pieces each. Sprinkle the meat with a bit of salt (careful here, the ham is salty too) and pepper. Then place one sage leave and half a slice of Parma ham on each piece of meat, securing with a toothpick.


2. Dust the scallopini with some flour and saute them in some butter or olive oil (medium heat). Since the meat is very thin, this won't take long and you can remove the scallopini after 1-2 minutes on each side. If you are cooking for 3 or more, I recommend you do this in batches.


3. Once the veal has been cooked put it on a plate and set aside. Now add the white wine to the pan. Let the wine bubble away for a few minutes before adding 1-2 tablespoons of cold butter, stirring in well (the butter will bind the sauce, giving it a smooth almost creamy consistency). Season to taste with salt, pepper and a sprinkle of sugar (the butter will take the edge of the acidity of the wine, but you may need some sugar in addition to this). You can also add some fresh sage leaves if you want to.  Before serving, return the meat to the pan and allow to reheat in the sauce for a few minutes.


4. For the mash, simply peel the potatoes and cut in to 2cm cubes. Cook in salted water until soft. Drain. Add the butter, milk (or cream), the cayenne, salt and pepper and mash using a fork until it has reached a creamy but still slightly chunky consistency.


Wednesday, December 12, 2012

German dumplings...with a twist

Dumplings are a staple of German cooking. Traditionally they are made from potatoes, but I prefer the variety made from bread. To the uninitiated the method I use to make these might seem strange, but it's really quite easy. The dough can be prepared in advance, which is convenient when you have guests. I would always recommend making at least enough for 4, even if you are cooking for just two people, because the left-overs are delicious.


Ingredients (for 4):

300gr white Bread from the day before (rolls work best)
220ml milk
100gr bacon
1 medium-sized onion
Small bunch of parsley
2 eggs
Butter
Nutmeg

Preparation:

1. Cut the rolls in 1cm cubes and warm up the milk. Place the bread in a large bowl and add the milk. Weigh the mixture down using a plate and a can of tomatoes or similar and allow to soak for approximately 15-20mins. 

2. In the meantime, chop the onion and cut the bacon in small bits. Fry both in a bit of butter over medium heat until the onions are soft. Transfer on a plate to cool down.


3. Once the bread has soaked up all of the milk, add the eggs, the chopped parsley, the bacon-onion mix, salt, pepper, and some nutmeg. Mix(using your hands) until you have a sticky dough. 


4. Take a clean kitchen towel and soak it in water. Lay it out on your work surface and place your dough in the middle, forming a sausage shape (see picture below). Roll the towel up, twisting the ends for added pressure, and tie the ends using cord. The whole thing now looks like a large piece of wrapped candy. 


5.Heat up water in a large casserole and, once it starts simmering, place the dumpling in the water. After 30mins the dumpling will be ready and can be unwrapped.


6. There are two ways to serve this. The simple version is to slice the dumpling and serve as it is. The second version (which I usually reserve for the left-overs) is to fry the slices in a bit of butter before serving.

Glazed carrots: two variations

Carrots in their different varieties make a great side-dish. They are easy to make and most people like them. Simple boiled carrots are of course a total no-go, but glazed with a bit of butter or, in the more interesting version, with chili and ginger, they are the perfect accompaniment for meat and fish dishes. 

Glazed carrots...the simple way


Ingredients

500gr carotts
2 tbs Butter
300ml vegetable stock
1 tsp sugar


Preparation:

1. Peel the carrots and cut them into regular sticks (I usually cut them in half and then quarter them lengthwise). 

2. Place the carrots in a deep pan (it should be large enough for the carrots to be spread quite evenly) and add enough stock to just cover them. Add a bit of salt, a tablespoon of butter, the sugar and bring to the boil. 

3. All you now need to do is wait until the liquid has boiled off. This should take about 20mins, by which time the carrots will be tender and you only need to add another piece of butter and a bit of black pepper to finish them.


Chili-Ginger Glazed Carrots

This recipe was published by a German cook called Tim Mälzer (the German Jamie Oliver) and served to us at a dinner party by my friend Alex. It is similar to the recipe above, but the chili and ginger give these carrots an additional twist. 


Ingredients:

500gr carrots
1 red chili
1 clove of garlic
20gr fresh ginger
250ml vegetable stock
Butter

Preparation:

1. The carrots are peeled and cut into sticks, same as above. The chili is sliced finely, the same goes for the garlic and the ginger. 

2.  Heat a bit of olive oil in a deep pan and fry the carrot sticks over high heat for about 5min. Add the garlic, chili, and ginger, and fry for another minute before adding the stock. 

3. Let the stock boil away (which should take about 10-12 min) before adding salt, pepper and a bit of butter.